Getting Started In Model Engineering
1 - A Space To Work In
Model engineering these days tends to cover a wide range of interests. From steam locomotives to 3D printing, through horology and electronics not to mention CNC machining and computer programming! So depending on your direction of travel into the hobby, whether inspired by an exhibition model or a internet image or just fancy building something different, one of the many facets of model engineering could satisfy your "Meccano Gene".


Model engineering or perhaps it should be called home engineering, will allow you to indulge your passion for things mechanical. Model engineering can be a great hobby whether you like miniature engines, clocks or want to build a 6" scale traction engine. The miniature engine photo (1) (Click An Image for a larger View) is a 32 cylinder air driven engine by Motores Patelo the cylinders are 13.75mm dia with a 10mm stroke. Amazing work, see more detail on 95octane. The skeleton clock photo (2) is by Buchanan an Australian clockmaker who also happens to be into model engineering. It has been ongoing from 2003 until 2018. See the build at My Time Machines. The build also has a thread on HMEM. Well those should have whetted your appetite to get building!
A minor caveat before we get going: Model engineering can be a rather expensive hobby and getting started is not a step to be taken lightly. You probably already know that but worth emphasising nonetheless!. Having said that it can be an expensive hobby, you don′t need to do everything at once, your ideal workshop is unlikely to come into being over a weekend. Search the web and you will easily find pictures of home workshops that are equipped with every machine known to man and a tool for every purpose that are almost large enough to run a space program from. You will also find the workshops of very skilled engineers who produce magnificent models from a tiny garden shed or in a back bedroom, I have even seen a workshop in a wardrobe.
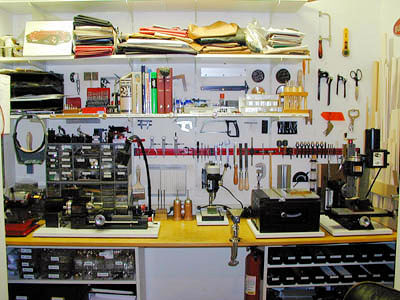
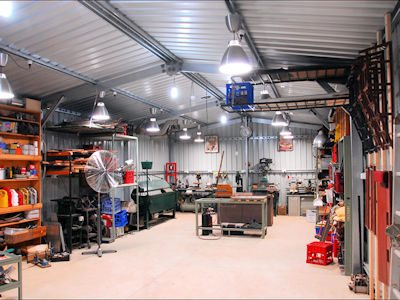
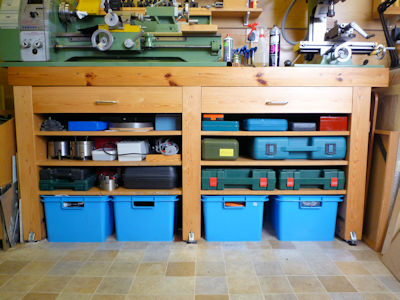
A couple of photos of workshops from the web to encourage you. Not quite a wardrobe but a smallish cupboard is the very neat & tidy workshop (3) of Marvin Meit who uses a Sherline lathe to make parts to super detail model cars. For working on larger cars is Julian Edgar′s slightly bigger Australian twin garage workshop (4) there is a lathe and milling machine hiding in there somewhere. Building the workshop from the ground up is detailed in Julian′s blog, worth a read.
So, what do you really need to get started? The first thing is inspiration and the second is somewhere to work and the tools to make your masterpiece. The skills to use the tools will develop as you go along. It might however, before spending lots of cash, be worthwhile seeking out your local model engineering club, maker space or Men's Shed. Talking to like minded individuals is always productive and many clubs have workshops where you can use the machinery and perhaps get some advice and instruction. It is also worthwhile joining or at least viewing a couple of the forums on the internet. The Model Engineer Forum is a good place to start, worldwide membership with a very wide range of interests. Then find one of the more specialized forums that aligns with your particular interest, you will probably have to sign up for these but it's usually free to become a member. With some preliminary research done it is now time to decimate the bank account.
The Workshop
This is mostly going to come down to what is available but give a thought to size requirements. A small steam engine, model boat or R.C. plane can be built in a spare bedroom. A large scale locomotive or traction engine is going to want something a bit bigger and definitely not upstairs. Roughly speaking the opportunities are:-
- An existing room you can "acquire" - bedroom, cellar, study or perhaps a large cupboard.
- An outbuilding - garden shed, summerhouse, barn, garage.
- A purpose made workshop that may already exist or if you are really lucky built to you own design.
- A rented space - there are self storage facilities and workshop places about but may be pricey.
- If no where else the local club workshop or Men's Shed may suffice.
With a bit of lateral thinking and a little adaptation there are plenty of opportunities for the workshop needy out there. Someone somewhere has exactly what you need to house your workshop!
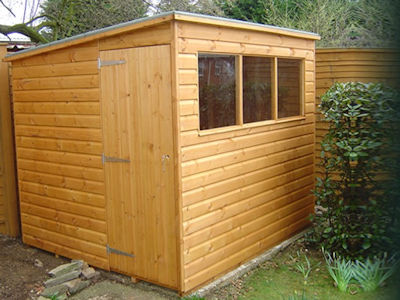

The basic garden shed is available in many styles and sizes and with a little work can be transformed into a useful work space, this example (5) from Allsheds Ltd. The used shipping container (6) will take a little more work to get ready but makes a very solid and secure workshop. Used containers are readily available for not too much cash and a quick internet search will find a supplier near you, this one from Cleveland Containers. It may even be possible to find a pre-converted workshop in a container from ex-MOD or industry sources. See Containers Direct for some more ideas.
When selecting a suitable location there are a few things to think about apart from simple availability. Try also to think ahead, what might you need to do in the future, will you need bigger or more machinery (of course you will). I have listed a few things to consider but I doubt if I have covered every eventuality.
- Access: stairs whether up to a bedroom or down to a basement or cellar can make installing machinery difficult. Likewise narrow doors and 200m of narrow uneven path will deter the most helpful of delivery drivers. If you are having to rent or borrow space make sure it will be accessible when you need it.
- A good solid floor: preferably reinforced concrete to give a good vibration free machine mounting surface, this might be a bit difficult in most bedroom locations. Sheds with flimsy wooden floors will need reinforcing or concrete machine pads cast through the floor. It is good if the floor has an easy clean surface, polished concrete, epoxy or paint perhaps.
- Good insulation and draught-proofing: not so much for warmth but to maintain a constant temperature to prevent condensation on machinery. If in the house this will already be in place but a shed or garage will probably need lining. Garage "up and over" doors are large cold radiators, line them well or add an internal wall. Along with the insulation some form of heating, perhaps a thermostatically controlled fan heater set low. Open fires and gas are really non-starters for the workshop both on safety grounds and because of the water vapour released.
- Solid walls or thick internal lining: this partly goes with the insulation phase. You will need to hang lots of shelves and cupboards and most engineering tools are not light. Consider a good thick ply or OSB wall lining, plasterboard really can't take that much weight. A good solid lining to a timber framed shed or summerhouse will add considerably to the strength and improve security.
- Lifting equipment: with weight in mind if you are into the larger model (or full size repairs) consider that you may need a hoist of some description which will need suitably strong walls or roof. A roof level RSJ installed at an early stage could save lots of messing around later.
- Good electrical supply: with plenty of sockets, mid level (300mm - 500mm above bench height) surface mount trunking is ideal and relatively easy to re-position or retro-fit sockets later. If you need large machinery then a 3-Phase supply may be needed and this could be difficult (read expensive) in some places. Where possible the supply should have it's own distribution board possibly with an RCD circuit breaker but note that RCD's don′t always work well with motors. A main breaker that shuts down all the machinery and sockets (apart from the heating) is worth considering but difficult to fit later. If you are not happy installing the electrical supply then a qualified electrician is a must.
- Good lighting: shadow free background lighting and lots of it. LED strip lighting is great, tubes or stick on strip, but consider warm white for comfort, you will also need additional machine lighting. If you use fluorescent tubes get high frequency fittings to avoid strobe effects on rotating machinery, change tubes regularly.
- Security: to protect your tools and masterpieces, good locks and solid doors and if you have windows fit frosted or patterned glass especially if they are where others can look in, window bars may be in order. Consider an alarm connected to the house system, possibly also a fire alarm. There are systems that will alert you by mobile phone, useful if your workshop is not nearby. Suitable precautions may help with insurance premiums. Oh yes, you need insurance but don′t necessarily rely on the household policy.
- The neighbours: OK so you get on really well with the couple in the flat next door but using a lathe on a bench fixed to the party wall may not go down too well especially if you like working late. Similarly taking up black-smithing on a modern housing estate may not encourage neighbourly feelings. Oh yes, the nearest neighbour may be the wife, partner, flatmate or friend who does not appreciate metal swarf embedded in the carpet!
- Planning: most workshops are unlikely to need planning permission but a large garden structure or additional garage might. If you alter an existing building, install heating, windows or electrical supply you might need building regulation approval. A quick phone call to the local authority may save hassle later.
- Luxury! Two areas one dirty one clean, running water a sink is always useful, access to a WC, a telephone for emergencies or to order more stock. All you need then is a fridge and somewhere to make tea and you can stay all day.
My own workshop developed over many years but has always been outside in what is broadly speaking a garden shed. You can have a look at the Workshop Tour for more details.
Benches & Worktops
With the workshop space established it is time to start filling it up. Whatever you are going to make you will probably need at least one bench to work on. Whether ready made or home built the workbench needs to be solid with a flat top. For lighter work a bench can be mobile with either locking wheels or jacks. Most likely the bench is going to be placed against a wall so unless the wall is dead flat think about an upstand on the rear of the bench to prevent small objects disappearing down the gap. For heavy work consider bolting the bench to the floor and/or wall.
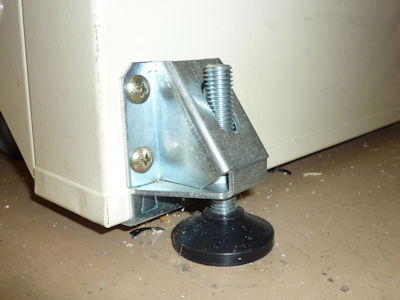
A good starter for a bench is something like this (7) Axminster Work Station it has a thick wooden top on a sturdy steel frame, comes as a flat-pack which takes a couple of hours to put together. I have one which I fitted a woodworking vice to and added wheels and levellers to make it semi-mobile. These heavy duty, 270kg each, levellers (8) (also from Axminster) are useful for any bench especially if the floor is a bit wavy. This bench comes with drawers and a storage area with a shelf so little wasted space. The bench top is laminated wood so stays flat but is on the soft side so it may be worth covering the top with a sacrificial layer of ply/mdf/lino etc.. If you use the levellers you may want to fit a lock-nut to the threaded leg and make sure you can get to the allen key hole in the top.
You may well need more than one bench and want something heavier, there are plenty ready made but building a bench is pretty straightforward and will give you exactly what you need. An advantage of building your own benches is that you can make them the right height for you. What is the right height? Ultimately it is what you are comfortable with but a rough guide is that the top of your bench vice or lathe cross-slide handwheel should be at elbow height.
The framework for a bench can be wood, metal or even concrete. The bench-top will probably be wood but a cast concrete slab is a possibility. For hard use bench-tops use layers of ply/mdf/osb or solid timber but whichever you choose it needs to be at least 40mm thick, definitely not bendy. The bench top is likely to get rough treatment and plenty of oil/paint/solvent on it so needs either an impermeable surface or a good few coats of varnish or epoxy. Covering the bench with a layer of hardboard/masonite which can be renewed when needed is popular. For an extra hard wearing bench-top cover with sheet steel. Welded steel tube or angle makes for a really strong frame which can be made to your own design although ready made steel frame benches are available.
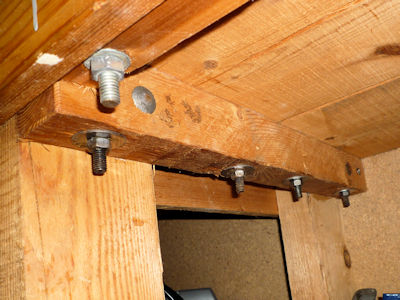
My machine bench (9) is about 40years old, (there is also a fitting bench built the same way) I built it from sawn timber, 4"x2" for the leg frames and 9"x1½" planks for the top the overall dimensions are 73"W x 20"D x 35"H (1860mm x 510mm x 900mm). The strange dimensions are because I made it to fit between the door and the wall, the height suits me and the shallow depth is to save floor space. The top planks are covered by a layer of ¾" chipboard screwed and glued on. There is a batten along the front to increase stiffness and the front edge and batten is covered with a facing board which also adds stiffness. The frames are bolted together (10) with coach bolts and nuts so no great woodworking skills required, not a mortice or tenon in sight. The bolted construction also means that you can adjust the frames to square easily. To retain the squareness and brace the bench more chipboard screwed to the ends and a large panel across the back. Originally that was it just one saggy chipboard shelf in the middle of each side. Much later I added the drawers and extra shelves all in 18mm MDF. Everything has several coats of varnish. Retro-fitting the drawers was interesting as the space under the top was a bit trapezoidal! The coach bolts all seemed to be in the way as well. Which only goes to show that you need to plan ahead, I just made it up as I went along all those years ago.
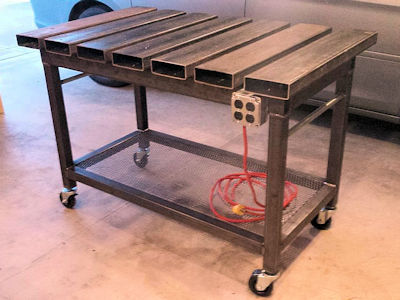
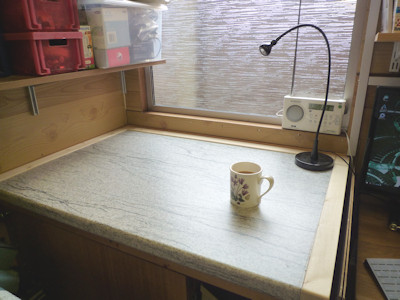
You may need something more specialised like this welding bench (11) this is from an article on Instructables detailing the construction. If you don′t need a welding bench often you could make a wooden cover for it and use as a normal bench. Lastly is a worktop (12) rather than a full bench that I prepared for my 3D printer build. This utilises an offcut of kitchen worktop which makes an ideal bench top for marking out areas, electronics or similar light construction area.
I have gone on at some length about benches because they are an important item in your workshop. It is worth the time an effort to get something that is tailored to your needs. Even if you do a lot of machine work you will need to file/bend/hammer the odd part and you will need somewhere to assemble the job in hand. If you are using small machine tools you will have to stand them on something and a solid bench is a good foundation towards accurate machining. Perhaps it is worth repeating, buy or make benches that are the right height for you, an aching back does not produce good work. If you have mobility issues or need to sit at your bench the height is particularly important as is leg-space under the bench. If you need something specially made or adapted, benches or other equipment, REMAP may be able to help.
Storage
Whatever you are making you will need some storage space. Nuts, bolts, washers, raw materials, paint, thinners, abrasives, adhesives, to mention but a few items. You will also need to keep tools and equipment safe and tidy. Most important of course is the box of "things that will be useful one day"! My own preference for storage is shelving, having added more as time went by. Drawers are good for smaller items but label them otherwise you will end up like me pulling out every drawer to find something. For less used items cupboards are good but of course you can't see what′s inside and deep cupboards can hide things at the back. The advantage of shelves is that you can see what you′ve got but things collect dust.
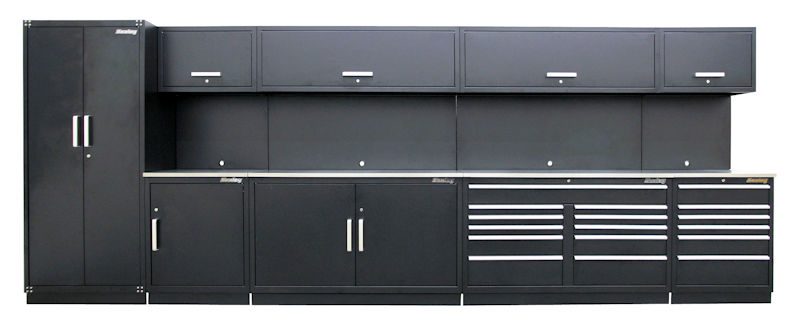
You may have room for an array of drawers and cupboards as shown above (13) but getting this lot in one go is a bit pricey. Similar storage systems are widely available from the big DIY chains, motoring stores like Halfords or of course from Amazon. Prices and quality range widely so it is worth hunting around. Halfords, for example, regularly have their range of garage storage at much reduced prices. You may also pick up slightly damaged units at the local store for a good price.
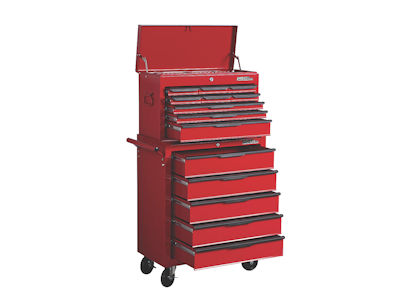

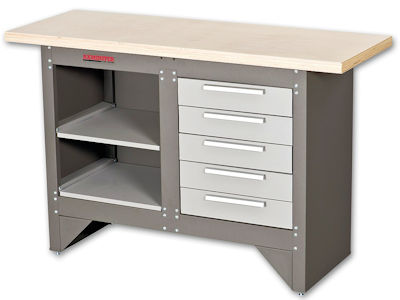
A slightly more modest investment will get some useful storage units. The first unit (14) has a top box with narrow drawers which could be useful for small tool storage or for measuring equipment (Available From Screwfix). The trolley (15) could be used to carry a small drill, grinder or other machine and make it mobile if space is at a premium (Available From Cromwell).
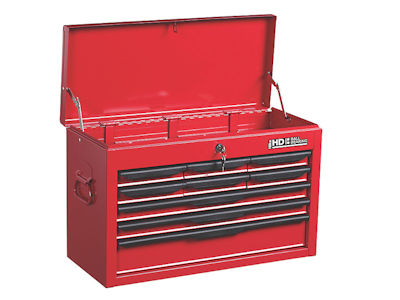
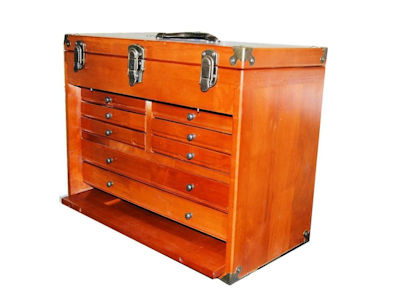
The metal tool-box (16) is a modern take on the toolmakers cabinet and is very useful for keeping delicate measuring tools and suchlike safe. If you like the traditional approach, wooden toolmakers cabinets (17) are still made and a quick search on eBay will find plenty 2nd hand.
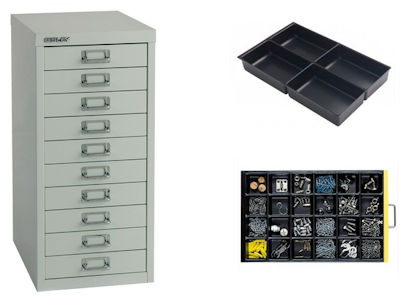

Office furniture can be useful for small part storage (18) and the Bisley range have drawer dividers available as an extra (Available From Furniture@Work). These are quite expensive new but can often be found in good 2nd hand condition. Plastic storage bins (19) come in many sizes and can either be used loose on a shelf or fitted to a purpose made wall-plate. Best to avoid the plastic wall-plates as these get brittle and crack. From many suppliers and some of the small cheap versions are available from DIY stores. If you want a larger more specialist range then a storage specialist like BigDug or Bay Shelving is probably the way to go.
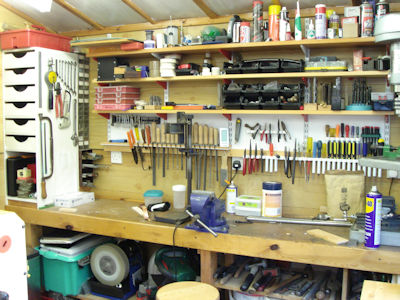

So far the storage systems looked at have been purchased ready made but there is plenty of scope for home-made solutions. In fact with odd spaces and specialised equipment to store it is often the only way. Old cupboards or kitchen units can be pressed into service or if you are a woodworker excellent units can be made from scratch. As I said earlier my chosen storage system is mainly spur shelving fitted to the walls. Spur shelving is ideal as it is easy to move the shelves around and the brackets come in plenty of different sizes. The shelves are supplemented by drawers under the machines and a few small drawer units for nuts and bolts and plastic bins here and there. The wall behind the fitting bench (20) also has some home made racks for small tools and files. The rack for the files is just a piece of wood with slots cut in and the tool rack (21) is made from a selection of pipe-clips. The white painted storage unit (far left) uses some old wooden filing trays that were being thrown out in a homemade chipboard carcase. There are a few more pictures in the Workshop Tour.
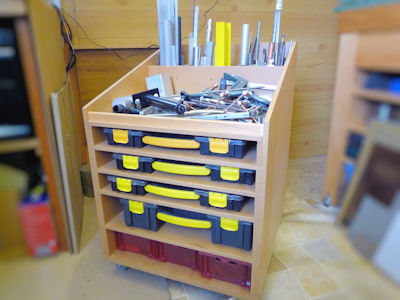

One area of storage which can be difficult is keeping raw materials, mainly bar stock but you will likely need to find a home for sheet and plate. Small pieces can easily be stored in a plastic box under a bench but longer bits will need their own space. I built a mobile storage unit (22) for bar stock but the various bits of metal are in vertical slots at the rear. This, as it happens, was a bad idea as the short bits are unreachable at the bottom and the long bits try to poke you in the eye when searching for the short bits! The slots for various boxes at the front are good though. I have another rack made from 300mm lengths of square plastic pipe (23) which works much better for bits of silver steel (drill rod) and small brass sections. A longer version of this would be better under one of the benches, I will get round to it one day. If you need to store longer lengths of material then a wall mounted rack vertical or horizontal will be needed. If you have roof space then this could be used but keep an eye on the weight.
It is pretty well impossible to cover every eventuality in a few web pages but hopefully this first page will have helped in creating a decent work space for your new hobby. Page 2 goes on to cover some basic hand tools page 3 looks at joining parts together and pages 4 and 5 cover lathes and milling machines.
Further Reading
- Websites
- Model Engineering Website - Starting In Model Engineering by Graham Howe
- Steve′s Workshop - Getting started in model engineering
- Tudor Barker - Help a Newcomer into Model Engineering
- Home Workshop - My Workshops by Harold Hall Books
- Setting Up Your Home Workshop - a basic introduction by Stan Bray
- Setting Up Shop - The Practical Guide to Designing Your Dream Workshop by Sandor Nagyszalanczy. Mainly about woodworking but some useful information.
- Shipping Container Homes - Techniques for making a container into a useful space.