Getting Started In Model Engineering
2 - Hand Tools
Now that you have somewhere to work, something to work on and plenty of storage it is time to start filling the drawers, racks and shelves with the tools and instruments that are going to shape your masterpiece. Model or home engineering is about shaping materials, turning a bar into a wheel, a casting into a cylinder or a sheet into a box. Once you have the parts assembling them and making it all fit together and work.
Working in metal, commonly steel, brass and aluminium, requires some specialist tools not usually available from the local DIY store. Unfortunately there is no "universal" metal shaping tool and engineering tends along the line of one tool for one job. You will over time accumulate rather a lot of tooling. It pays in the long term to select quality tools but as with most things in life the balance between affordability and other attributes needs careful weighing. Good tools will generally - Help to reduce accidents: Get the job done smoothly: Let you work faster: Help to improve your skills: Let you enjoy the work: Feel right: Last a long time. Of course many engineers enjoy making their own tools, yet another facet of the hobby
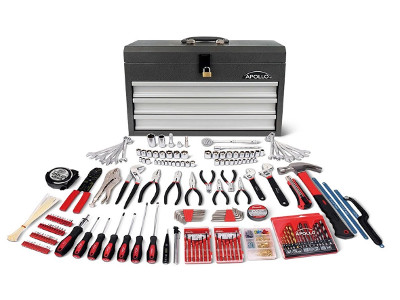
I don′t think a "beginners toolkit" exists as such although you may well see them advertised on eBay and Amazon. The problem with toolkits (1) is that they most times contain things that you will never use, for example the kit in the picture has eight pairs of pliers! Toolkits also often have the "wrong" tools, again the kit pictured has a claw hammer, whilst you can hit things with it it isn′t an engineers tool. Toolkits come priced from £10 to £10,000 you can almost guarantee that the cheap ones will contain really poor quality tools and you will never use all the tools in the expensive ones.
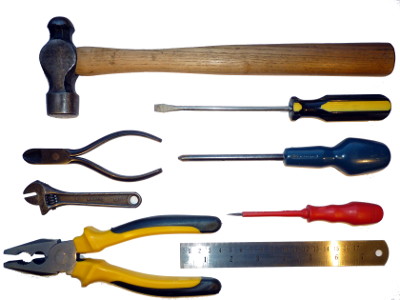
What you need to start will very much depend on your particular interests. There are a few things, however, that will be useful in any workshop no matter what the project. You could perhaps start with just a few basics (2) a small ball pein hammer, a couple of screwdrivers, I find that I mainly use just three of a huge collection, a PZ2, a 6mm flat and a small electricians style. Obviously you will need more tools but start slowly and only get what you need for the job in hand. The following sections cover in more detail the tools you might require.
Measuring & Marking Out
Whatever you are going to make you will need to make some measurements and transfer those measurements to the raw material ready to work on. The measurements you use will depend to a certain extent on what you are making but perhaps more so by where you are. Only three countries now use the imperial system, Liberia, Myanmar and of course the USA. The rest of the world uses the metric or SI system. You could of course declare independence and use the FFF (furlong/firkin/fortnight) system!
Whichever system you choose it is probably a good idea to standardize from the outset. When I re-equipped my own workshop I opted to go metric but I still have quite a bit of imperial equipment. To be honest I am still undecided as to whether this was a good idea, as I still tend to think in imperial. I can happily visualize an inch or a foot or a yard and to cope with metric measurements I convert on the fly knowing that ¼" ≈ 6mm, 1" ≈ 25mm and 1foot ≈ 300mm. If you want to make scale models of older machinery you will still need an awareness of imperial measure as that is what the original was built with.


Click On Image To Magnify
The most basic tool in the workshop is probably the steel rule and it is useful to have a couple a 6" or 150mm (3) for use around machinery or in the pocket and a 12" or 300mm (4) for setting out and use on the bench. You can buy steel rules marked in just one or in both measurement systems. Also handy is the tape measure (5) especially if you are building benches or erecting shelves.
If your eyesight is up to it, mine isn′t, you can work to an accuracy of about 1/64" or 0.4mm with a steel rule. Used with marking blue, surface plate and scribing block, setting/marking out with a rule is a useful skill to develop. Clear marking out can help prevent later machining errors.


Click On Image To Magnify
Once you have a steel rule I would suggest that a good candidate for the next purchase is a digital caliper gauge. Image (6) above shows a Moore & Wright basic series that can be bought for under £25.00. This will take internal, external and depth measurements. Digital caliper gauges have the advantage of reading either metric or imperial. Slight disadvantage is they don't work at all if the battery goes flat - always keep a spare. Shown in the same image is a Moore & Wright 0-25mm micrometer which is probably the next measuring instrument to get. This is a manual version and needs a bit of practice to read. I find that metric micrometers are more tricky to read than imperial ones, though it all comes with practice.
Whilst not essential the digital angle gauge, top left image (7), is useful when setting up items for machining. The internal and external calipers in the same image are not so much used these days but with practice can be used to turn multiple parts with repeatable accuracy, it′s all a matter of "feel". Screw thread gauge, bottom right, for identifying an unknown thread and feeler gauges for measuring small gaps. One item that will be required once you are machining things is the dial test indicator, top right. I find the lever type shown particularly useful for setting the machine vice parallel on the milling machine.
For marking out the essential tools are an engineers square, top right of image (8), a scriber, a centre punch (I prefer the automatic type) and a pair of dividers. Painting the metal surface with blue makes the scribed lines stand out clearly you can use liquid marking out blue (Dykem) or a permanent marker works well for small jobs. Top left of image (8) is a surface gauge or scribing block. This is a small one I made at college (not very good the pillar isn't upright). The surface gauge is used to scribe lines parallel to an edge and is used on a surface plate.
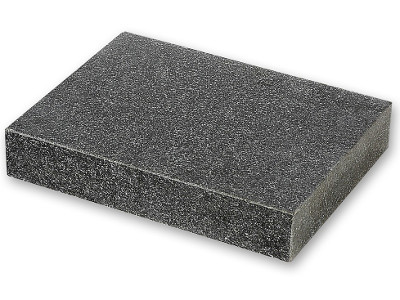
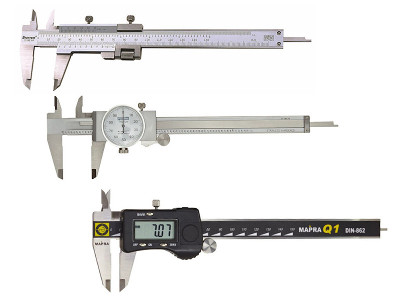
A surface plate (9) is a useful tool for marking out, checking and assembly, a good one is expensive and may not be used much to start off with. You can initially make do with a piece of plate glass or an off-cut of granite worktop which will be quite flat enough for everyday use. The one shown above is from Axminster and will set you back about £80.00. An improvement on the scribing block or surface gauge is a height gauge where you can set the scriber height above the surface plate very accurately. Three basic types of height gauge, Vernier, Dial and Digital, progressively more expensive. Whilst on about the different types of height gauge it may also be worth noting that the same types apply to calipers. Image (10) top to bottom Vernier, Dial and Digital. You will often see or hear caliper gauges referred to as "Verniers" make sure you buy the type you want. A true vernier (see Wikipedia) can be a bit of a challenge to read accurately, these days I think I would recommend going straight to a digital caliper, much easier. You can pick up a useable digital caliper from your local supermarket (Aldi or Lidl) for under £10.00 which will definitely get you going. Much of the measuring and marking out equipment you need can be obtained from Machine DRO As mensuration equipment specialists they carry a good stock with both beginner and expert ranges worth just browsing a bit to see what is available and get an idea of relative pricing.
Cutting & Shaping
Having marked out the shape you want to produce the next stage is to start removing metal. A lot of home engineering work relies on a machining operation to remove waste material but there still exists the need to refine shapes and remove metal manually.


Click On Image To Magnify
To cut material to length or to remove a large amount of waste metal the hacksaw is a much used tool, often quicker than setting up a cut on a milling machine or power saw. The pretty standard pattern (11) these days is with a pistol grip, older models have a file type handle in line with the blade. Blades for hacksaws are a consumable and can′t be re-sharpened. Blades come in standard pitches of 14, 18, 24 and 32 teeth per inch (tpi). Basically the thinner the material the larger the tpi should be, trying to keep at least 2 teeth in contact with the metal to avoid sticking. Many hacksaw blades are now made with a very flexible bi-metal construction, HSS for the teeth with a softer backing. Blades are relatively cheap so worth getting a few of each pitch from a good maker Eclipse, Starrett, Sandvik or Bahco perhaps. Like all saws the teeth are set to cut a kerf (width of the cut slot) wider than the thickness of the blade, because the teeth are small hacksaw blades are "wave" set. Blades are typically 12" (300mm) long with a hole at each end for fitting to the frame. The pins that hold the blade are usually fitted to a square peg that allows the blade to be rotated through 90°, useful when sawing a strip of a sheet of material. The blade is tensioned by tightening a wingnut on the front peg but some frames may be fitted with an over-centre lever.
A handy tool for the smaller job and for plastics is the junior hacksaw (12). Commonly supplied just a bent rod frame with slots to take the blade but slightly better is the pistol grip type which allows some variation in blade tension. There is a lot less choice for junior blades, 6" (150mm) long, they are normally 32tpi and made using a fairly soft alloy. They wear out pretty quickly on anything but the softest material. Supplied in minimum packs of 10 for around the £2.00 mark. Like their bigger relative the blades are normally inserted to cut on the push stroke but if you prefer can be reversed.
If you need to cut intricate shapes from sheet material then you would need a piercing saw (13) sometimes called a jewellers saw. The example shown has an adjustable frame but some are fixed much like the junior hacksaw. The blades are much finer and have their own sizing system from 8 the coarsest at 28tpi down to 8/0 at 89tpi see Piercing Saw Blade Size Table. Piercing saw blades are inserted to cut on the down-stroke, the saw is used vertically and the work supported on a jewellers bench peg. If you want to make clocks you will definitely need to learn the use of one of these saws. Have a look at Dave Cushman's web page for a tutorial.
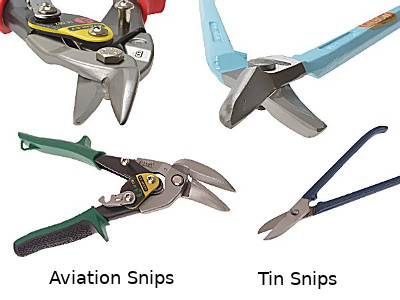
Other basic metal cutting hand-tools are snips and chisels. Snips or tinsnips (14) come in many patterns and are for working sheet metal. The basic style is much like a heavy duty pair of scissors. Not particularly easy to use if you want to keep the metal flat. Aviation snips are perhaps more useful as they have built in levers which means you don′t have to squeeze so hard. Wonkee Donkee Tools have some useful pages describing many types of snips
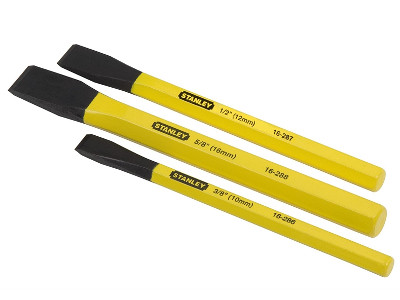
Whilst often thought of as a stone cutting tool cold chisels (15) were widely used for shaping metal. Perhaps not used much these days having been largely replaced by the angle grinder. Small cold chisels can still be useful in the workshop for removing rivets or cutting the small notch in sheet metal. Chisels need to be kept sharp and the head should not be allowed to mushroom. And just in case you were wondering a hot chisel is a blacksmiths version sharpened at a different angle for use in the forge.
Having cut our metal to an approximate size and shape it now needs finishing to size with nice smooth edges. The use of a file was something every apprentice was taught and with practice it is possible to produce very accurate work. There are many different shapes, sizes and cuts of file with something for every purpose. Two important things to remember when using a file Always fit a handle and Only use for one type of metal The first one I always do the second I invariably forget! Perhaps a third rule should be always buy a good brand, Starrett, Valorbe, Grobet, Nicholson or Tome Feteira for example. Cheap files wear out quickly and make, what should be, a quick job really hard work.


Click On Image To Magnify
I should have mentioned earlier perhaps, that before you can do much sawing or filing you will need something to hold your workpiece while you shape it. The usual engineering solution is the bench vice (16) bolted firmly to the bench. Plenty of sizes and styles to choose from but the 4" Record would be a good choice. Most of these vices come with hard steel jaws with serrated faces, the original jaws for mine can be seen sitting on the slide, the hard jaws can badly damage the workpiece. A worthwhile first job is to either replace the jaws, they are just screwed in, with aluminium or bend up some protectors from a bit of sheet. The soft jaws will get chewed up but can easily be re-faced or replaced. If you are only going to do small work a smaller vice could be used or you can buy small vice clamps that are held in the big one. The image of my bench vice shows it fitted to a swivel base, I can honestly say that in all the years I have been using the vice I have never swivelled it even once!
Back to files. The most useful files for everyday work are flat or hand files. Flat files taper in width and thickness whereas hand files are parallel for their entire length. Both types come in various lengths from 4"(120mm) up to around 18"(450mm). Depending on make they may have teeth on none, one, or both edges, edges with no teeth are referred to as safe edges. Files are also available with single or double (cross) cut teeth and several grades of coarseness. Single cut files tend to give a smoother finish especially on thin edges or sheet, double cut removes metal a bit faster and are not quite so prone to pinning (clogging). The image (17) above shows three useful grades of flat file in single cut. There is quite a useful Wikipedia Files page with more information.
It is interesting, if not slightly confusing, that there are two different systems for grading files American and Swiss. American Pattern files are generally available in three grades of cut Bastard, Second Cut and Smooth. Swiss Pattern files, used in the main for smaller files, are available in seven cuts, 00 to the finest 6. The ranges overlap with Bastard≈00, Second Cut≈0 and Smooth≈2. The cut on American Pattern files also vary with length so a 14" Bastard file is coarser than a 8" Bastard file! There are also plenty of specials out there not to mention woodworking rasps. The Bahco files shown in (18) illustrate just a few of the shapes available:- (A) Square, (B) Warding, (C) Hand, (D) Half Round, (E) Three Square, (F) Round. Buying sets of tools is not always a good idea but I would make an exception for these 4"(100mm) smooth cut files with handles already fitted. A useful File Identification Chart can be found at KMS Tools. I still have no idea why Triangular files are called Three Square...
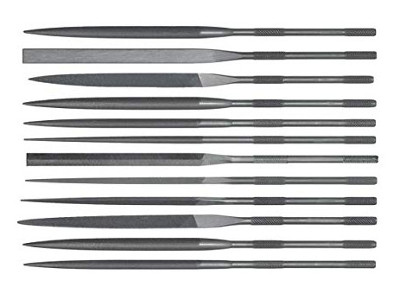
There are many other types of file for special purposes. A very common type that you will probably find a use for is the needle file (19), often sold in sets of 6 or 12 these small files are good for finishing work and clockmaking. Like their bigger cousins various cuts are available and they usually have a built in handle rather than just a tang. The handles are thin and it is easier to use the files with a detachable handle that may be supplied with a set. It is also possible to obtain needle files made with a diamond coating which can be useful for working some types of plastic.
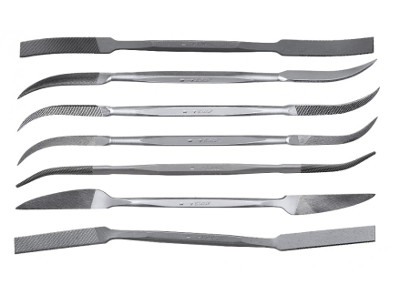
For finishing castings, jewellery or other shaped pieces you may want a riffler file (20), these have short cutting lengths and are curved to fit internal corners. Sometimes called die-sinking files they are available in various cuts, some quite coarse for woodworking.
I am not sure if abrasive paper counts as a tool but having filed a part to size you may well want to impart a smoother finish or even polish the surface. There are many types of abrasive paper but probably most useful for metalwork are emery cloth and wet & dry paper. Emery is a naturally occurring mineral the major part of which is aluminium oxide. It is softer than some of the newer abrasive materials and doesn′t embed in the work. Being soft it has a shorter working life and tends to become detached from the backing cloth. Emery cloth is available in grit sizes 40 (coarse) to around 400 (fine). These days I mostly use wet and dry paper which is silicon carbide abrasive bonded to waterproof paper available in grit sizes 40 (coarse) to 1200 (very fine). Whilst abrasive paper or cloth may be used "as is" it is usually better to have some sort of solid backing. I was taught at school to wrap emery cloth around a file to give support. Now I usually stick strips of wet and dry paper to a wood backing and use in much the same way as a file. This is a much safer method of using abrasive on the lathe if you need to. It is often better to work in reverse, lay the wet & dry paper flat on a surface plate, sheet of glass or even MDF and move the work piece back and forth. Much easier to prevent rounded corners this way.
Further Reading
- Suppliers
- Machine DRO - Measuring and marking out tools & instruments.
- Axminster Tools & Machinery - Wide range of tooling and machinery. They also run a number of instructional courses. A few stores around the country, there may be one near you.
- ArcEuroTrade - excellent online retailer of hand tools and machinery. Pretty well a next day service for most small tools. Websites
- Model Engineering Website - Kitting Up by Ron Chernich
- Home Workshop - My Workshops by Harold Hall
- Little Machine Shop - Using A Steel Rule
- Knowledge Base - Wonkee Donkee Tools have a useful selection of articles on tools with plenty of illustrations. Books
- Zeus Data Tables - no workshop should be without a copy - more of a tool than a book!
- Engineers Black Book - contains a wealth of useful information, 160 matt laminated grease proof pages. (Zeus tables but more)
- Basic Benchwork - one of the Workshop Practice series of books
- Metalworking - A book of tools, materials, and processes for the handyman, with 2,206 illustrations and working drawings - this is a reprint of a very old book (1904) but may still have some relevant information.