Getting Started In Model Engineering
3 - Joining The Parts Together
Now that you have all the parts nicely cut to size and finished to perfection they have to be joined together. There are plenty of methods to assemble a finished model but top of the list is probably the humble nut and bolt. Usually nuts and bolts are bought rather than made unless the model calls for something out of the usual like square nuts or dome headed bolts. Other common methods of joining parts are welding, brazing and a whole range of soldering methods. It is not unusual to find adhesives being used in modern engineering construction. and of course some models will require the use of rivets to maintain an authentic appearance.
Drilling Holes
Using nuts and bolts or studs with nut will involve making holes in the parts these may be either through holes or a tapped hole. Whilst it is quite possible to drill holes by hand with an old fashioned "egg-beater" hand drill, a drilling machine (drill press) or milling machine makes things much easier.


Click On Image To Magnify
The cordless drill (1) has been around for many years (Black & Decker 1964) and is an extremely versatile and useful tool. No workshop should be without one for fixing shelves driving screws and general household duties. Drilling accurately placed and true holes with a cordless drill is not however particularly easy. It is possible to get a stand to fit most makes of drill but these are usually fairly flimsy affairs suited only for the lightest of work.
A better bet for the home workshop is a small bench mounted pillar drill (2) and this should probably be considered for the first machine purchase for the new workshop. Pillar drills come in all shapes and sizes from the micro for jewellery work to the industrial leviathan weighing in at lots of tonnes. The pillar supports the drill head and usually carries the motor and the drill table. A pillar drill may also be floor mounted just having a much taller pillar, this would probably be the norm in an industrial setting. For the home workshop pillar drills are available from less than £50.00 but the cheaper offerings tend to suffer from some common faults. Look particularly for the drill table being at 90° to the column and not flexing. The quill also needs to be free of sideways play and the belts easy to change. Most important the motor needs sufficient power, the Warco Drill illustrated (2) above has a 550W (¾HP) motor which is about the minimum for a drill of this size. Make sure also that the quill has a suitable internal taper like 2MT so that the chuck may be changed or larger drills fitted directly into the quill, some small bench drills have the chuck fitted directly to the quill which is not so useful. Some drill tables can rotate and tilt but I have never used the function on mine.
A variation on the standard pillar drill is the radial arm drill (3) which might be useful if you need to drill very wide items. The arm at the top of the pillar can slide back and forth to change the distance from quill to pillar. The head can also be rotated to allow drilling at an angle to the table. On larger industrial versions the overarm is a fixed length and the drill head incorporating gearbox and motor slides on ground ways some even have powered feed to move the head. A drawback to the smaller radial arm design like the Axminster drill illustrated (3) is the amount of space needed behind the pillar to clear the arm.
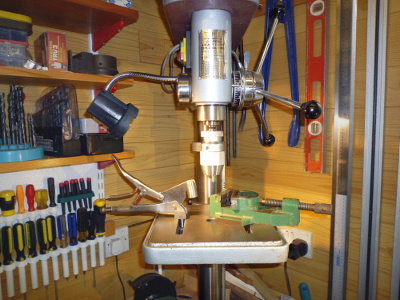
The pillar drill at (4) is my venerable bench drill. It describes itself on the label as "Tull Heavy Duty Drill Machine 12 Speed". Well I don′t know about the duty bit but it is certainly heavy. It was the first machine I bought for the workshop about 40 years ago. The company doesn′t exist any longer but the drill still works, it is underpowered but gets the job done. I have added a NVR push button and a worklight (worklight project here) and is currently fitted with a keyless chuck. The drill stands with it′s back into the corner which save a bit of space. The drill table can tilt side to side but I have never used this function. One of the most useful features is the rack & pinion rise and fall mechanism which makes moving the table up and down nice and easy. On the table are two must have accessories a hold down clamp that I made (details here) and a drill vice. You should always clamp work securely to the table, sharp bits of metal spinning at several hundred RPM can be a bit scary!
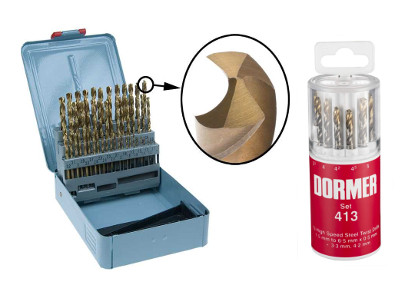
The first thing you will need to go with the new bench drill is some drill bits. Like everything else in engineering there are many varieties of drills from the ubiquitous twist drill to diamond coated core drills. Get going with a set of jobber twist drills. The two sets shown above (5) are both good starter sets. The set of 51 metric drills are from Arceurotrade and will cost in the order of £40.00 (less than 80p per drill). The smaller set of 13 Dormer drills available from Greenwood Tools costs around £22.00 (about £1.70 per drill). Both sets contain split point ground drills which work well and can be used without first centre drilling. Both sets are also TiN (titanium nitride) coated for improved wear characteristics. Drills are one of the few tools worth buying in sets as at sometime you will use them all. If you are working in imperial you may also need to consider sets of letter and number drills together with the basic fractional drill set. At some stage you may also need long reach drills for special jobs and for larger holes it may be necessary to buy blacksmiths (reduced shank) drills or possibly better individual morse taper (MT) shank drills.


Click On Image To Magnify
I mentioned earlier that I had fitted my drill with a keyless chuck. I find these more convenient than the old style Jacobs chuck with a key. I have a couple that I use on the lathe as well, save hunting for the right key all the time. The only drawback I can see to the keyless design is that they are no good for tapping as they loosen if turned backwards. The image above (6) shows the two chuck types alongside one another together with a suitable chuck arbor (arbour sometimes). Chucks and arbors are usually supplied separately and you need to get one with the correct taper for the chuck. There are two taper ranges JT (Jacobs Taper) and B (DIN taper) (Taper Dimension Table). The chuck arbor for a drill normally has a tang to extract it using a taper wedge that fits in a slot in the drill quill. arbors for milling machines usually have a thread for a draw-bar, you can get screw in tangs to convert.
The pillar drill is not limited to just using twist drills in the chuck. Image (7) shows a selection of tooling that may also be used. Clockwise starting from the top left is:-
- Large diameter twist drill with morse taper shank to fit directly in the quill. Mostly found on drills over 13mm but I have some long reach (300mm) drills around 6mm on 1MT taper shanks.
- Hole saw and arbor, these can be useful sheet and plate work. They don′t tend to cut accurately sized holes but useful for removing waste material prior to another machining operation.
- Trepanning tool or tank-cutter, again for sheet metal usually, can be used on wood as well for things like loudspeaker apertures.
- Step drill or cone cutter, useful for control panel work, the one shown cuts from 4mm to 20mm in 2mm steps a true cone cutter does not have any steps and produces holes with slightly tapered sides.
- Countersink bits. Single flute or 3 flute but the 6 flute ones used for woodwork tend to chatter.
- Machine reamer, for accurately sizing pre-drilled holes. Twist drills unless sharpened very carefully will not produce an accurately sized hole. For good fits a reamer will remove the final 0.01mm or so leaving an accurate and round hole.
You can also fit grinding wheels, flap discs, polishing mops and other tools to your bench drill. One thing the bench drill does not do though is milling, don′t try it it will likely end in disaster! Basically the drill press is not sufficiently rigid to cope with side thrust and drill chucks will loosen if subjected to sideways force.
A quick look at other drilling equipment for the workshop. I have already mentioned the cordless drill which can be very useful. Another drill I find very handy is the small high speed drill. I have a small Proxxon drill (8) this came as a kit complete with a selection of small drills, burrs, grindstones, cutting discs and sanding discs. Very useful for very small holes and PCB work, also ideal for cleaning up castings etc. There is a small drill press stand available to take the drill which clamps around the standard 20mm collar. The collar also means that an adaptor can be made to fit the drill into the lathe toolpost for use as either a drill or toolpost grinder.
Threading & Tapping
Joining parts by means of a thread is a common workshop practice. Using hand tools it is quite possible to cut quite large external threads and tap holes up to around 20mm, after that it becomes hard work and machine operations are preferable. An external thread is cut using a die held in a diestock and an internal thread is cut into a suitable sized hole using a tap held in a tap wrench. Whilst it is possible to buy sets of taps and dies it may be better to just buy good quality singles as needed. Some like to keep taps together with the appropriate sized tapping drill ready to go but you will still need appropriate tapping tables handy. The Zeus Book is a useful workshop must have, £6.75 from Amazon.


Click On Image To Magnify
Taps and dies come in many different varieties but the basic hand tap is often bought as part of a set similar the Axminster Set shown at (9) above. The cheaper sets tend to contain carbon steel taps and dies rather than the harder wearing HSS (High Speed Steel) versions. Having a similar set I can also state that the diestocks and tap wrenches are not the best! To save money these sets usually have just two taps of each size as opposed to a full range of three. The three types of hand tap can be seen in image (10) and are from the top: plug or bottoming, second cut and taper. To tap a blind hole You would start with the taper tap then use the 2nd cut and finish of with the plug tap to get a full thread as close to the bottom of the hole as possible. Apart from starting with the right sized hole the most important thing when using a tap is to keep it in line with the hole. You can use some sort of guide perhaps even a small block of metal with a suitable hole through it to align the tap or start it off in the bench drill. It is possible to tap under power but different taps work better. Image (11) shows at the top a spiral flute tap where the spiral ejects the swarf upwards so can be used for tapping blind holes. There are different degrees of spiral for different materials. In the middle is a spiral point tap (sometimes called a gun tap) which ejects the swarf downwards so only for through holes. Both spiral types only have one tap for each size. The spiral flute is probably most useful as it can be used by hand or machine for through or blind holes. The bottom row of image (11) shows a common split die and a die nut. The split die can be adjusted in size very slightly using the screws in the diestock to enable a well fitting thread. The die nut is used for cleaning up a damaged thread not normally for cutting a complete new one.


Click On Image To Magnify
If you opt to buy individual taps and dies as you need them you will also need to get the appropriate tap wrench and die stock. Image (12) shows three common types of tap wrench. At the top a large or medium style of wrench used for taps over about 6mm. The T-handled wrench in the centre is available in several sizes to suit smaller taps and may be fitted with a ratchet. At the bottom is a small wrench available with overall lengths down to about 50mm. The biggest problem using very small taps by hand is to prevent axial movement. A small sideways force can easily snap a small tap. Definitely use a guide or better a tapping and staking tool seen here on David Haythornthwaite′s website. There are other styles of tap wrench but usually aimed at the larger sizes.
Similarly with die stocks there are plenty of styles to choose from. Image (13) shows at the bottom a small "standard" type die stock to take split dies, note the three screws for adjustment. The centre screw has a point that tightens into the groove of a split die to force the sides apart slightly. The two side screws hold the die in place but if tightened with the centre screw loose will close the die slightly. It is important to buy the correct size die stock as dies come in several outside diameter sizes. My collection of die stocks take 12mm, 16mm, .8" and 1" there are other plenty of other sizes. The die stock in the centre is a larger version and has the facility to add guides to keep the die square to the material being threaded. It is possible to get similar guides for smaller die stocks, Harold Hall has a version you can build on his website. The much larger die stock at the top of the image is for cutting threads on pipes or conduit. The handle may be up to 1m long and the dies are usually in two halves or even four separate chasers fitted into a ratchet head. Probably not needed in your model engineering workshop!
If you have many holes to tap, a tooling plate for the mill perhaps, then you may need one of these for machine tapping. Image (14) shows an automatic tapping attachment for the bench drill (or mill). The tap is fitted into the collet chuck a suitable arbor is fitted to the top and into the drill quill. The arm at the side bears against the drill column or a fixture on the table to prevent the body turning. In use the The drill feed is pulled down and the tap rotates clockwise to tap the hole, when pressure on the feed handle is reversed the tap automatically reverses and unscrews from the hole. The body of the attachment contains a number of clutches and gearing to achieve the quicker reverse rotation. The clutches can also be set for a predetermined depth/pressure for tapping blind holes. A YouTube video of one working can be seen on MrPete222′s (Tubal Cain) channel. If you decide you need one sit down before checking the price.
Soldering - Brazing - Welding
The three main methods of joining metals together by use of heat and a filler material. All involve a degree of skill and as the saying goes practice makes perfect.
- Soft soldering is carried out at temperatures less than 450°C used typically for electronic work and plumbing. In the home workshop soft soldering may be used for making fuel tanks for small engines or caulking riveted joints on a locomotive tender. Soft soldering often uses a tin/lead alloy as the filler material (solder) although there is a move towards lead free alternatives.
- Silver soldering or hard soldering sometimes called silver brazing uses a filler containing a high silver content with copper tin and other metals to achieve melting temperatures from 600°C up to around 800°C. Home workshop uses include prefabrication of complex parts instead of using castings and boiler making.
- Brazing is akin to silver soldering but uses a filler rod of brass or bronze with a melting range from around 850°C to 1000°C. Home workshop uses are for repairs and fabrication. Brazing can also be used to join or repair cast iron using an appropriate filler rod. Brazing can be used to join dissimilar materials where welding would not work. Sometimes called bronze welding.
- Welding still uses a filler rod but actually melts the base metal to form the joint. There are several different types of welding but all create an alloy of the base metal with the filler rod to make the join. Home workshop uses are many from bike and car repairs through frame fabrication and resurfacing worn tooling.
Soldering, brazing and welding are complex subjects and I am certainly no expert. I learned to weld and braze 50 years ago and have had very little practice since. The interweb has plenty of information and these 3 links are a good starting point Solder, Brazing, Welding all from Wikipedia.


Click On Image To Magnify
For the home workshop a small electric soldering iron (15) like the blue Silverline one shown is often useful for electrical repairs. If you are into more advanced electronics or building CNC equipment then a slightly more upmarket temperature controlled workstation is probably more useful. Whatever you are working on a reel of solder wire (bottom right) is going to be needed. For modern electronics a small diameter flux cored solder is needed this is usually 60/40% tin/lead although lead free versions are now available. Perhaps interesting to note that for critical assemblies, aviation for example, tin/lead solder is still specified. At the centre of image (15) is an old style tin smiths soldering iron. Basically a large chunk of copper on a steel shaft. The iron is heated in a gas flame and the used to tin and join sheet metal. Tinning in this instance refers to putting a thin coat of solder onto the job prior to joining. Another way to join tin-plate, brass or copper sheet is to use solder paste, a mixture of powdered solder in flux. Paint where required, clamp parts together and heat, example lower left.
If you need to install central heating in your new workshop then image (16) is what you need to join the pipes. The solder shown is tinsmiths solder that comes in fairly hefty sticks. Easier for pipe fittings is to get a reel of suitable solder, similar to electrical solder but without the flux core. A small blowtorch using disposable gas cannisters and a tin of suitable flux are also shown. The flux is a necessity as without it the solder won′t stick! All the metal joining processes need a suitable flux to help keep the soldered surface clean and prevent oxides forming. The flux ensures a metal to metal contact without it you end up with a "dry joint". Essentially the soldering process aims to alloy the metal with the solder albeit only a few molecules thick. Welding of course makes the alloy much deeper but still requires a flux of sorts which is aimed to prevent oxidisation whilst the joint is being made.
Image (17) shows the things needed for silver soldering. Top left is the silver solder itself in the form of rods. These are available in many grades and thicknesses specific for the materials being joined. Most important is the melting temperature of the chosen silver solder. Quite often, particularly for boiler making, a job may be soldered up in several stages. Starting with a high melting point solder and working down in stages to the lower melting points. It is interesting to note that it usually requires a higher temperature to re-melt solder than it does for the initial application. Again the right flux for the job is a must and fluxes and solders tend to go together. Flux for silver soldering is available as a ready mixed paste or as a powder to mix with water. Silver soldering needs practice if you have not done it before well worth seeking advice. In the UK CuP Alloys is a well known supplier of materials, equipment and advice for model engineers. Be wary when buying silver solder you will see advertised "silver solder" with a 4% silver content but this is really a low temperature lead free soft solder for jewellery type work.
The other thing you will need for brazing and silver soldering work is a hearth of some kind. This can be as simple as a couple of refractory bricks laid on the bench or a purpose built affair with metal frame and suitable stand. The purpose of the hearth is to retain heat in the workpieces and to reflect and redirect all the available heat to where it is needed. This webpage on Building a Brazing Hearth might help. Some people have used Thermalite building blocks with some success they are lightweight and easy to cut. Don′t use the heavy concrete building blocks though and avoid the refractory bricks from old storage heaters.
There are many types of welding process but most common in the home workshop are the common forms of electric arc welding - MMA, MIG and TIG. Gas welding, oxy-acetylene or oxy-propane, is common in industry but costs, regulation and storage often preclude home workshop use.


Click On Image To Magnify
MMA - Manual metal arc or shielded metal arc welding often just referred to as stick welding. Uses a low voltage high current electric supply to create an arc between the work and a consumable metal rod (the stick). The heat of the electric arc melts both the rod and the work. The welding rods are covered in a hard flux coating which melts giving off gases to prevent weld contamination, introduces deoxidizers to purify the weld and creates a slag to protect the newly formed weld. The flux coating also helps stabilize the arc and provides alloying elements to improve the weld quality. Image (18) shows on the left a basic arc welder from Machine Mart which works from a domestic 13amp(UK) power supply. It will probably be OK for small jobs with steel up to 3mm thick. As with most small welding sets the duty cycle is fairly low so don′t expect to weld all day
MIG - Metal inert gas or gas metal arc welding. This uses a continually fed wire to create the consumable electrode. The wire comes in different sizes and materials to suit the job in hand. The wire may either be plain or be cored containing the flux. For plain wire it is necessary to use a shielding gas to protect the weld. Common gasses are argon (Ar) or carbon dioxide (CO2) both gas and wire are fed down the cable/pipe assembly to the welding torch. A button on the handle of the torch controls the wire feed. Some MIG welders are designated "gas/no gas" and can use either plain wire and gas or use flux cored wire.
TIG - Tungsten inert gas or gas tungsten arc welding. More like old style gas welding or brazing where you use a torch in one hand and a suitable filler rod in the other. The heat is supplied by an electric arc which is struck between the work and a tungsten electrode. The tungsten electrode is a consumable but will last some time in the inert gas environment. Like TIG a shielding gas is used usually argon but argon/helium is sometimes used depending upon the materials being welded. TIG welding is particularly useful for welding aluminium and stainless steels. A mid-range TIG welder from R-tech Welding is shown at (19) this unit will still work on a 13A 240V domestic supply but the duty cycle at top output is around 35%.
I can make no specific recommendations regarding welding equipment but would advise checking specifications carefully. Many of the welding units advertised on the interweb sound good but wont work on a standard domestic supply socket. Many require a 16A supply and some even a 32A supply the same as a domestic electric oven. Many have a very low duty cycle and will cut out (overheat) if used for more than a few minutes. I would suggest a specialist supplier, at least a recommendation from someone who uses the equipment regularly.
Apart from the welder you will at a minimum require a welding helmet, a good auto darkening one. You will need welding gloves. Helmet and gloves in image (20). Wear long sleeves and a high collar, long trousers and boots. Avoid turn-ups and places where hot sparks may lodge. Don′t tuck trousers in boots for the same reason. Many of the cheaper offerings will come with a hand held welding shield - get a good helmet instead. You only get one set of eyes look after them. Arc-eye is painful and you only need to look at an unshielded arc for a few moments to succumb. TIG welding particularly gives of plenty of UV radiation, unless you want an instant tan cover up!
There is of course another way of joining things together - glue or more accurately adhesive. There is a wide range of engineering adhesives and with the right one you can join pretty much anything to anything these days. Most useful for the workshop are probably the epoxy resins and the cyanoacrylates (super glue). Epoxy resins such as JB Weld are useful not only for joining parts but for example repairing blow-holes in castings and the like. The superglues are useful for temporarily mounting say a thin sheet of metal for turning being easily released by the application of heat. Also much used in the workshop are the Loctite range of thread-lockers and retainers made by Henkel.
This has been but a short introduction to the art of joining metal, I havn′t even mentioned spot welding, riveting or forge welding, but there are a few links below for some further reading to compliment the links already in the text.
Further Reading
- Suppliers
- CuP Alloys soldering and brazing materials and equipment. Websites
- Tap & Die - Wikipedia article on taps, dies and thread cutting
- Joining Materials - riveting, soldering and welding + gluing and screwing - Kiel University Faculty of Engineering
- Welding - Wikipedia article Books
- Drills Taps & Dies - one of the Workshop Practice series of books
- Welding - a Haynes Manual
- Soldering & Brazing - Workshop Practice series