Not put anything here for a bit so I thought I would just show what I was doing this morning. Apart from the workshop hobbies I also cycle a bit, nothing too strenuous you understand but I try to get in 20 or 30 miles a week. This is mainly in an effort to keep the weight down and keep semi-fit. A bit of a losing battle to be honest.
However the last few rides the chain was jumping occasionally. Checking the chain is easy just measure from one pin against a rule and the pin at the 12″ mark should line up. If the pin is more than 1/16″ away the chain needs replacing soon. Mine was a good 1/8″ longer so should have been replaced some time ago. (Although most fixings on modern bikes are metric a good few parts still use imperial measurements chains being and example with ½″ links.) Chains don′t really stretch but the rollers and pins wear and introduce slack. I should have checked more often as I ride mainly off-road and the chain is always covered in dust and grit which with water and oil make a nice grinding paste.
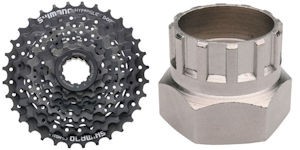
I fitted a new chain and found that the chain was jumping and skipping all the time, further checking revealed that the rear cassette appeared to be worn, at least that′s what it looks like to me. The teeth on the gears looked to have worn on one side. So I ordered a replacement Shimano 8-speed cassette. Bike repairs are quite easy but you need a few specialist tools, I bought a splined cassette lockring removal tool with the cassette for £4.99 but I forgot to get a chain whip (that′s what the cycling fraternity call them I would probably call it a chain wrench!). You can buy them from about £5 upto a ridiculous £40 if you want the real Shimano one! The tool stops the cassette turning while you undo the lockring. I could probably come up with an alternative but the right tool makes the job a little easier.
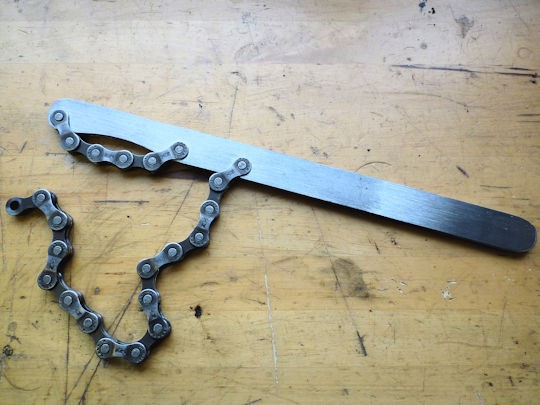
I looked at the picture in my favoured on-line bike store and thought it would be an easy thing to make. So I found a suitable bit of flat bar and set to. I used the old chain and simply drilled holes just big enough to take the chain rivets, these are a press fit in the chain plates so once pressed back in hold the chain in place. All the shaping I did on the new belt sander, only took a few minutes. Now waiting for the new cassette to arrive in the post to see whether the tool works.
I must remember to keep a closer watch on the chain and make sure that it is clean. I have one of those on-bike chain cleaners, rotating brushes in a plastic tank, that works quite well but the new chain has a removable link so I could take it off and dunk it in the ultrasonic cleaner. I am hoping that the other end of the drive, the chainring, is OK. It looks alright to me and I hope it is because that is a bit pricey to replace as it comes with the pedal cranks as far as I can make out. The joys of cycling!!
Update: the parts turned up the day after I posted. Nice smooth job replacing the cassette, took about 10 minutes, so much easier when you have the right tools! Pleased to report that everything works smoothly, no skipping or jumping, just need to fine tune the gear changes.